Index
-
Player on with HDMI cable connected to TV and TV on
As a first step it is necessary that the TV and Player are powered by electricity. So, it is necessary that they are connected to a 220V outlet.
In the picture below you can see the power cable of the player together with the player:
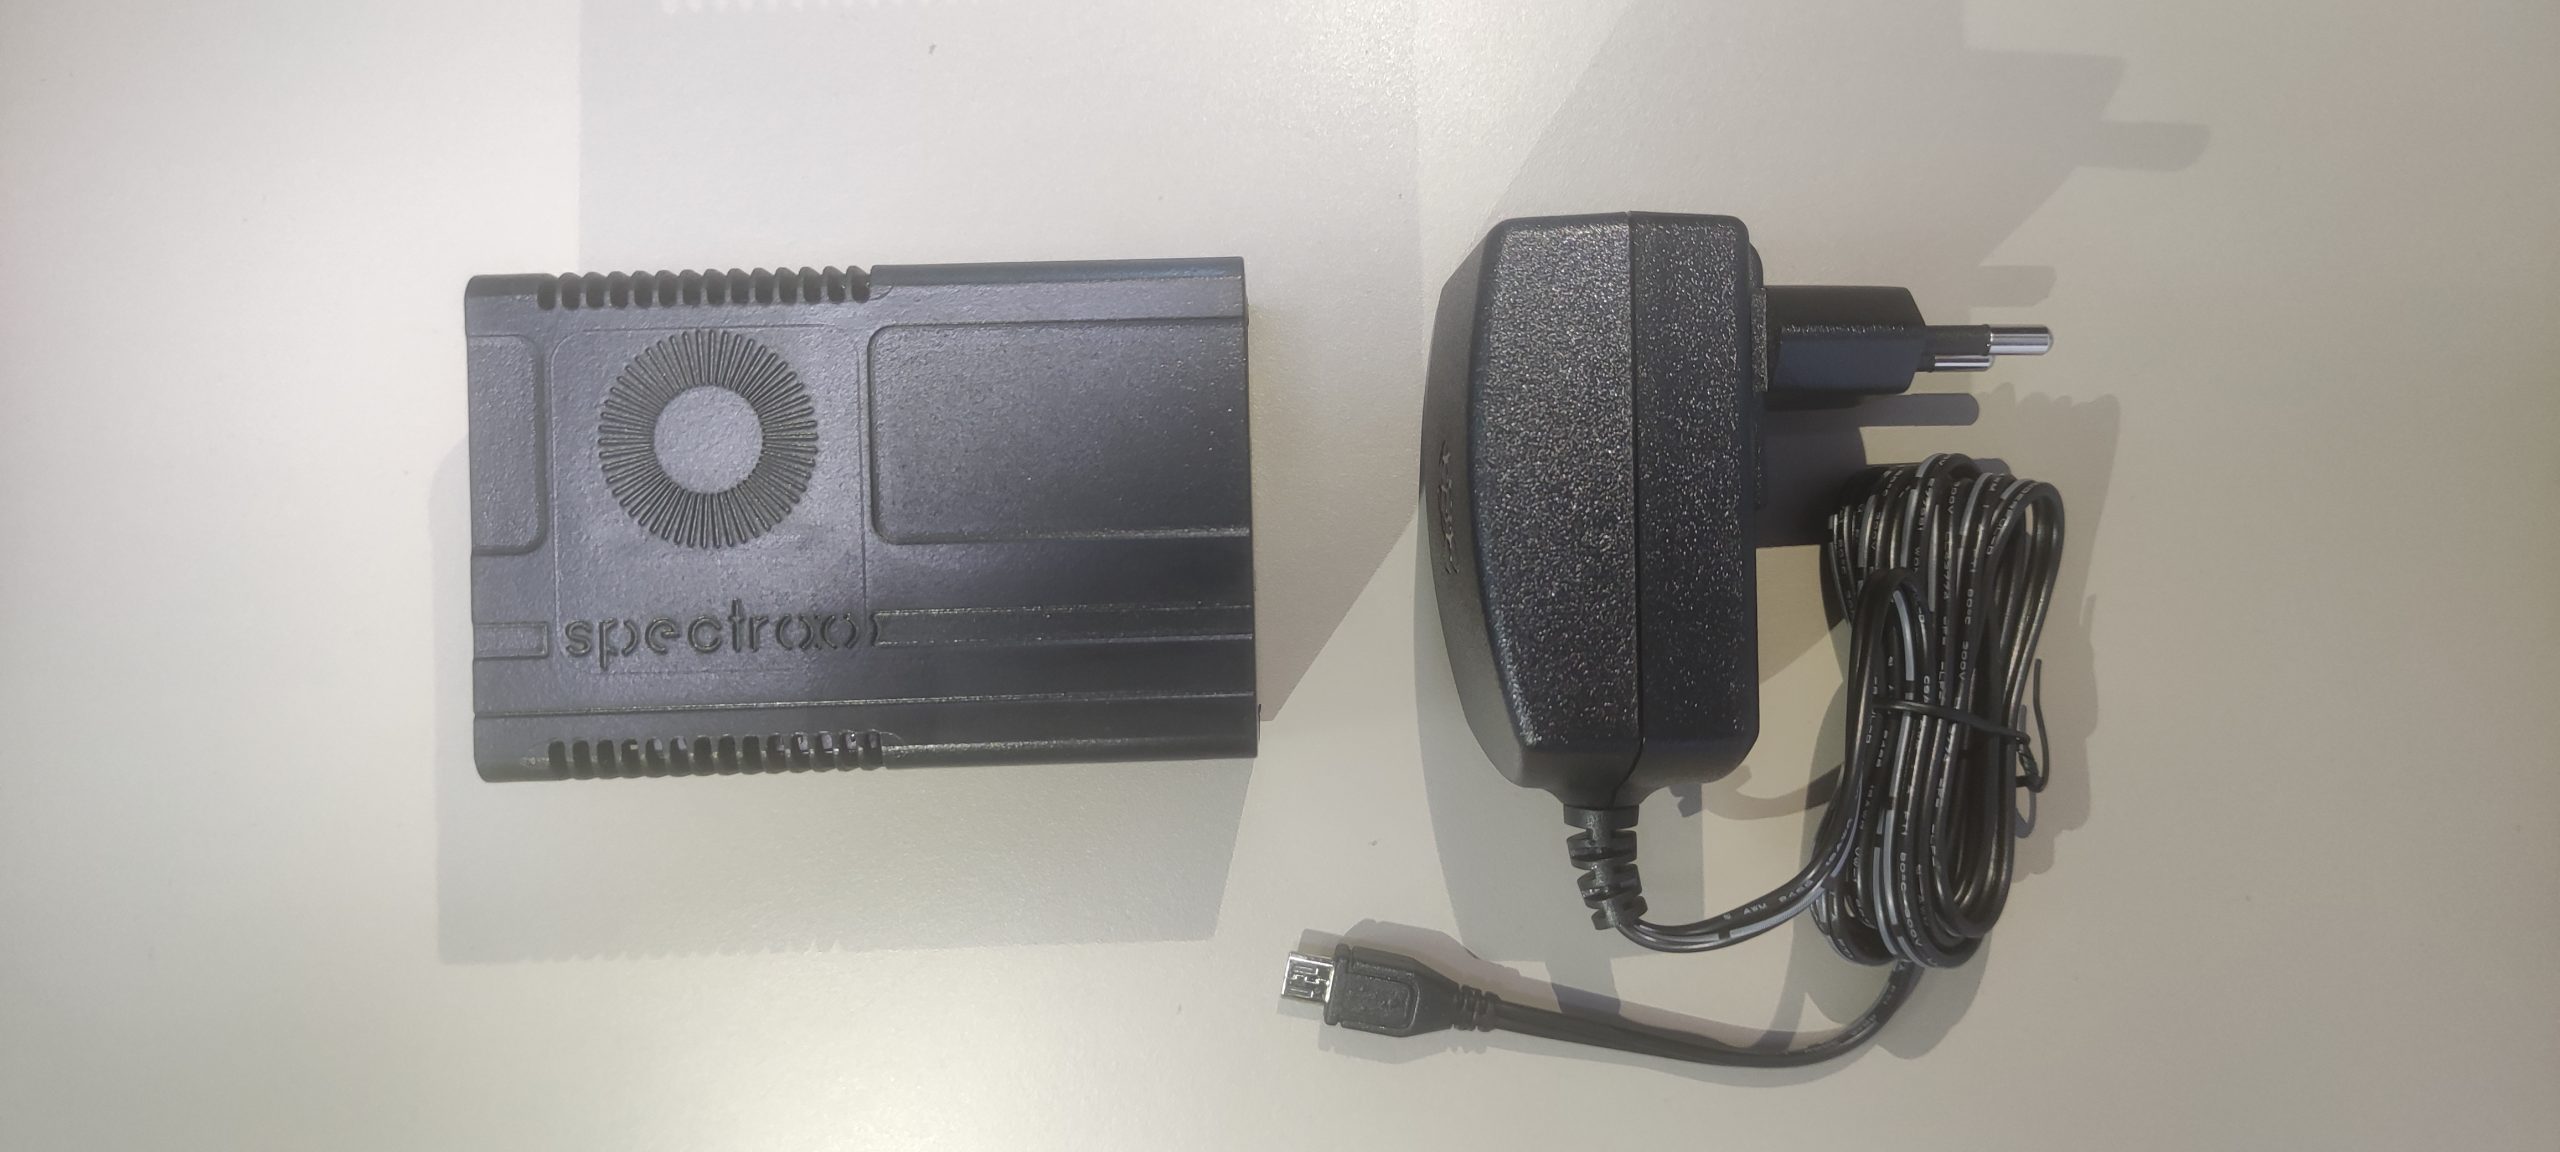
I’m going to ask you to power the player like in the video below:
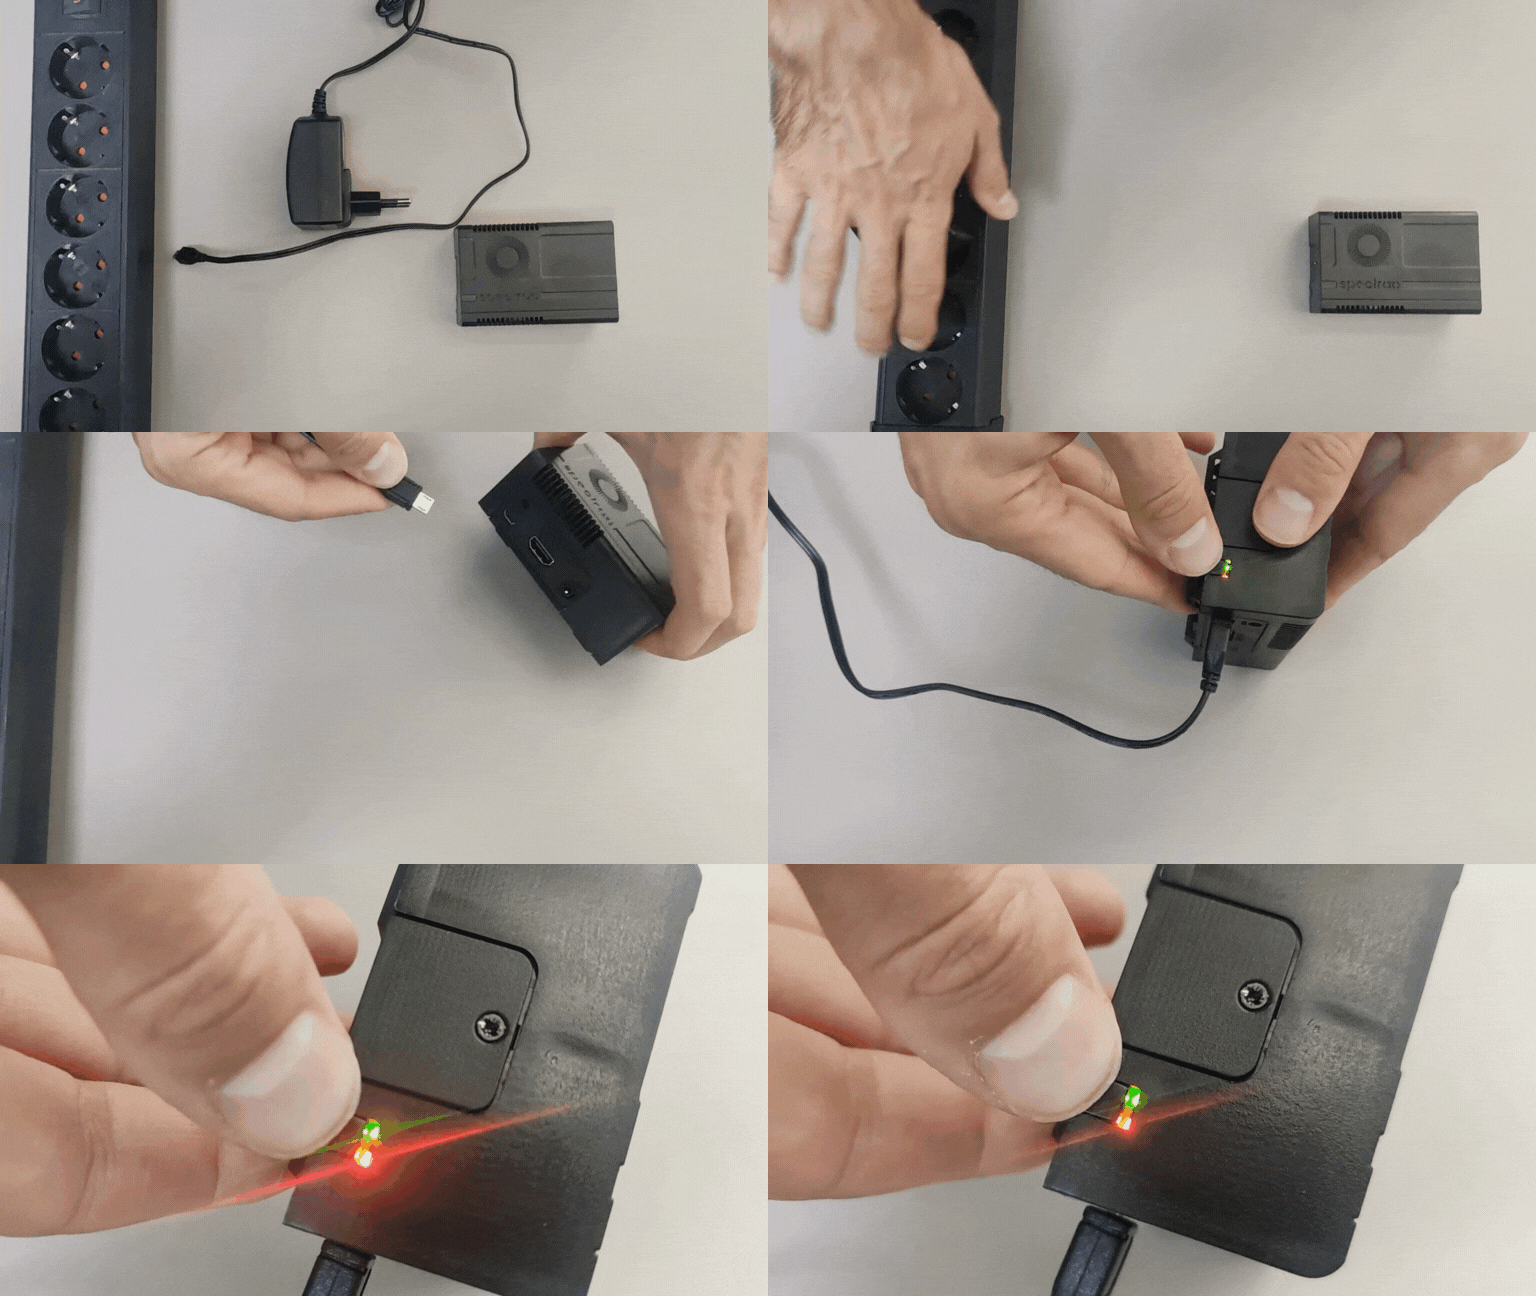
After you have performed the power up procedure, please make sure that the two lights on the player, the red one and the flashing green one, are lit as in the video above.
In the picture below you can see the HDMI cable:

It is necessary that this HDMI cable is connected between the Player and the TV as in the picture below:
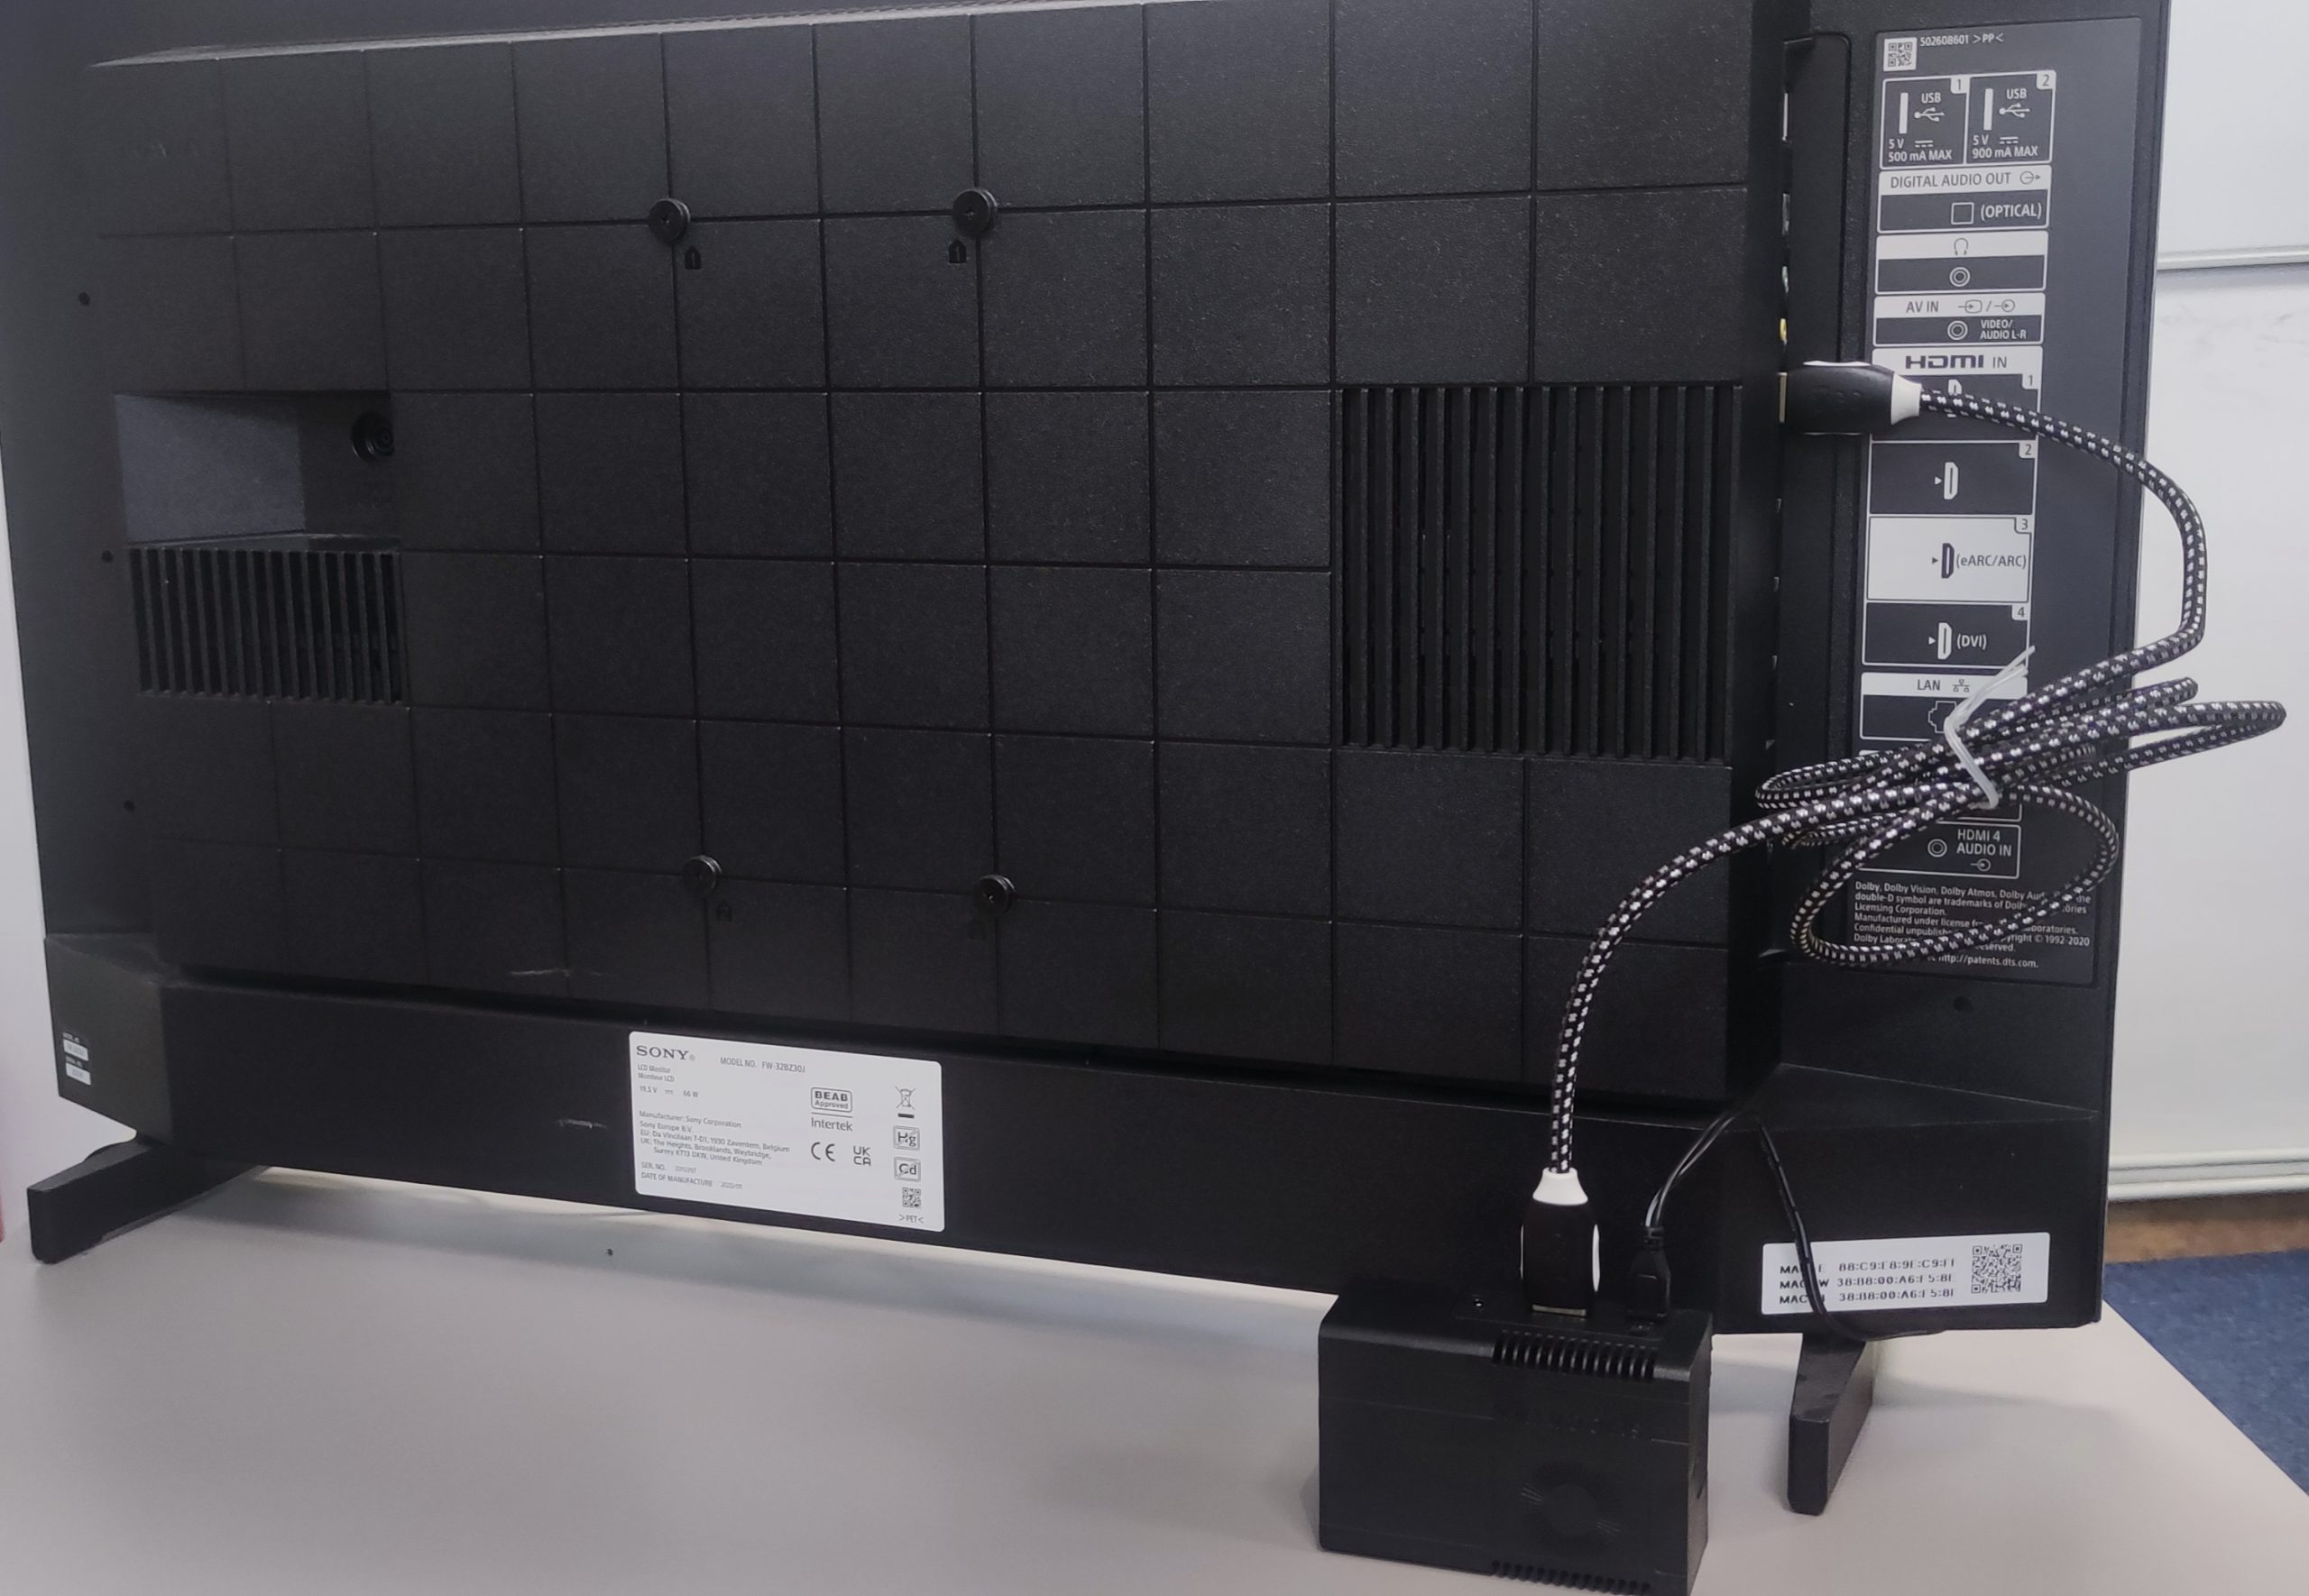
The TV must be switched to HDMI input 1, or another HDMI input of the TV if the HDMI jack has been inserted into another HDMI port of the TV. This is done using the remote control, press the SOURCE key on the remote control and then switch to the HDMI input from the menu displayed on the TV screen.
In the video below you can see how this is done:

-
Player issues SSID of the form Spectroo_0000xyzk ( or similar )
In the image below you can see an example of an SSID issued by the Player:
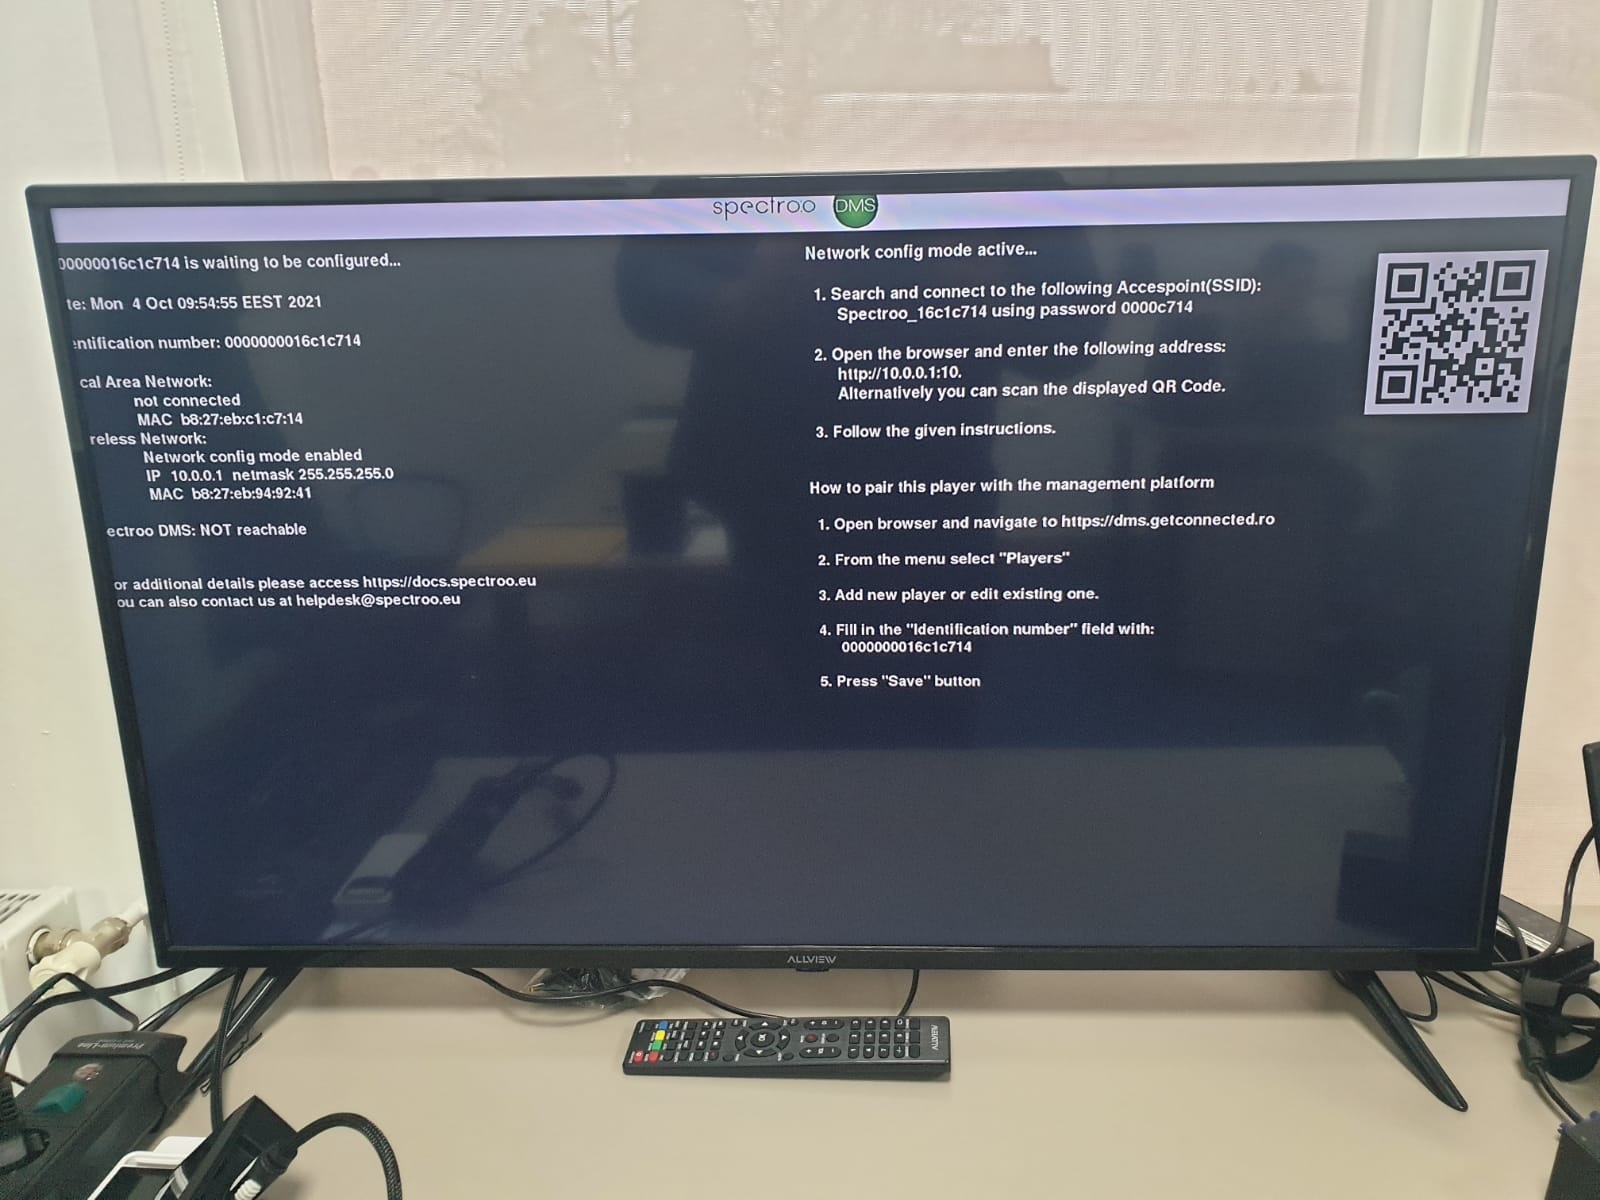
On the right side of the screen next to the QR code you have the necessary instructions to follow in order to carry out the whole process step by step.
-
We go through the first part of the process together, “Network config mode active…”
-
Let’s start with:
“1. Search and connect to the following Accesspoint(SSID):
Spectroo_16c1c714 using password ex:0000c714.”
Each Player has a unique password. Use the password displayed on the screen, it is displayed in the section “Network config mode active…” under point “1. Search and connect to the following Accesspoint(SSID)”.
In the image below you can see what this section looks like:

It is necessary to make a connection between our device and the player, this connection will be made via WI-FI.
In the video below you can watch how this is done:
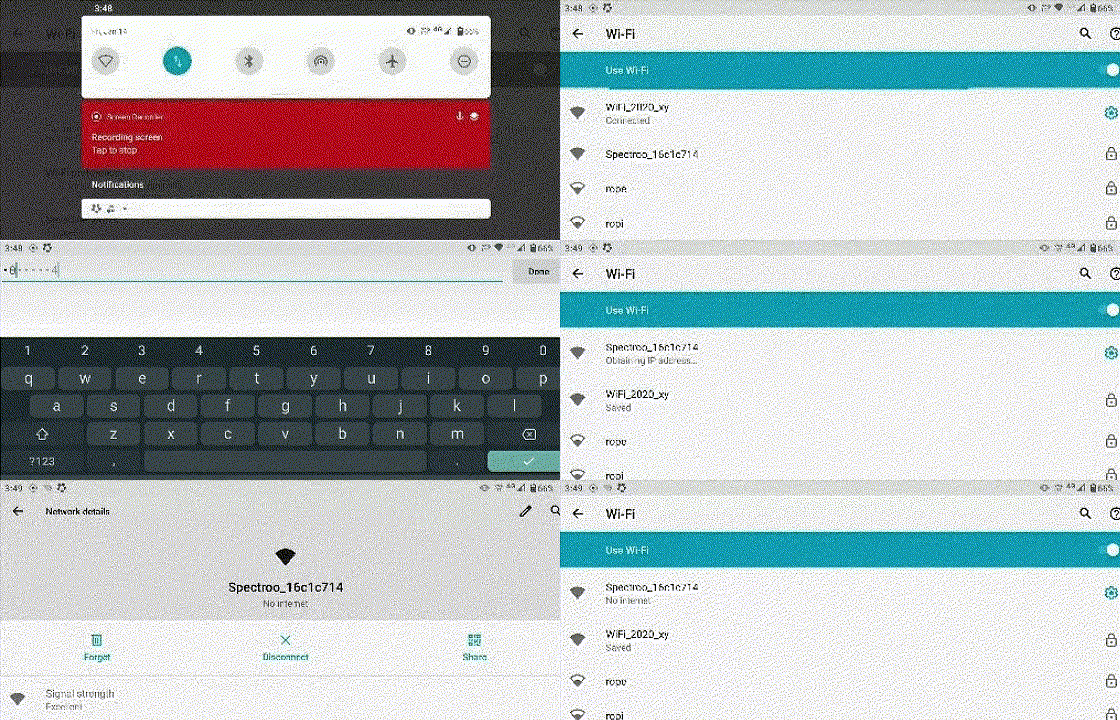
The login password consists of 4 zeros (0000 ) and the last 4 digits of the unique code on the player.
Ex: “0000xyzk…”
-
Next step:
“2. Open the browser and enter the following address: http://10.0.0.1:10
Alternatively you can scan the displayed QR Code.”
The QR code is located at the top right of the screen, as in the image below:
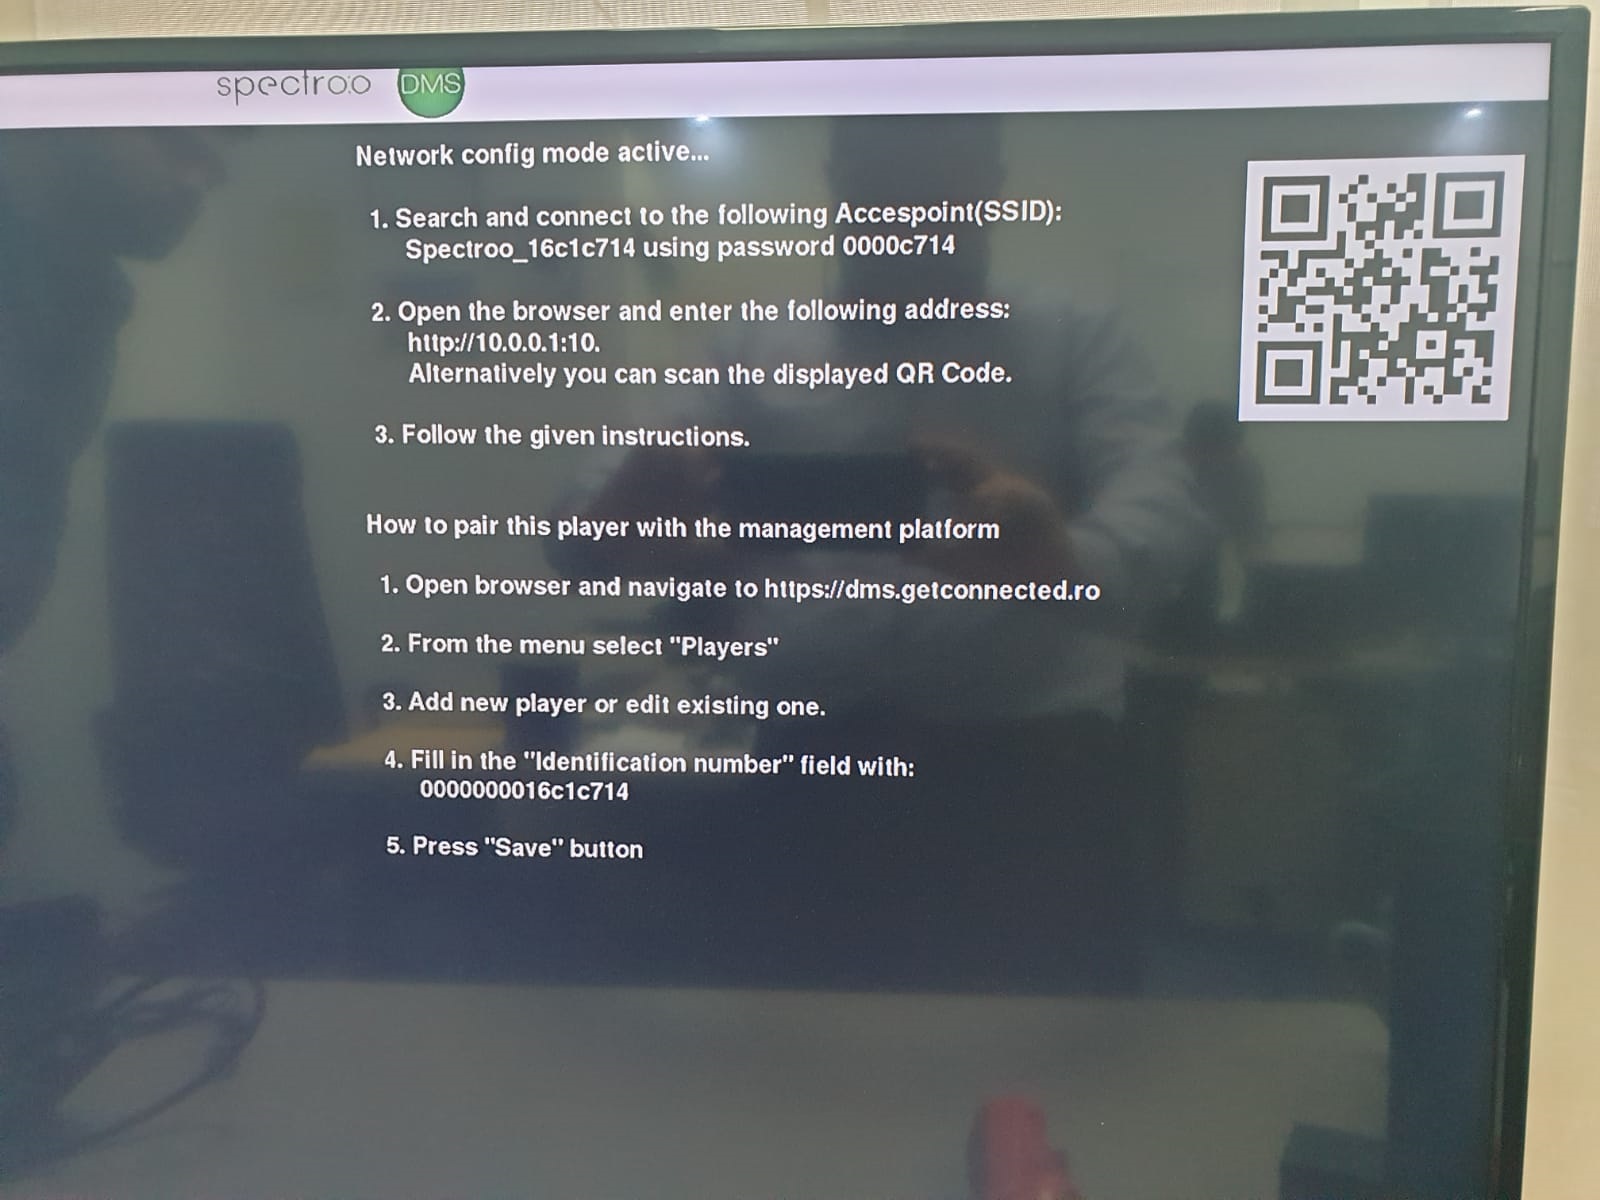
Once you have connected your Smartphone to the SSID issued by the player (you may need to try twice), go to a web browser: http://10.0.0.1:10
In the video below you can watch how this is done:
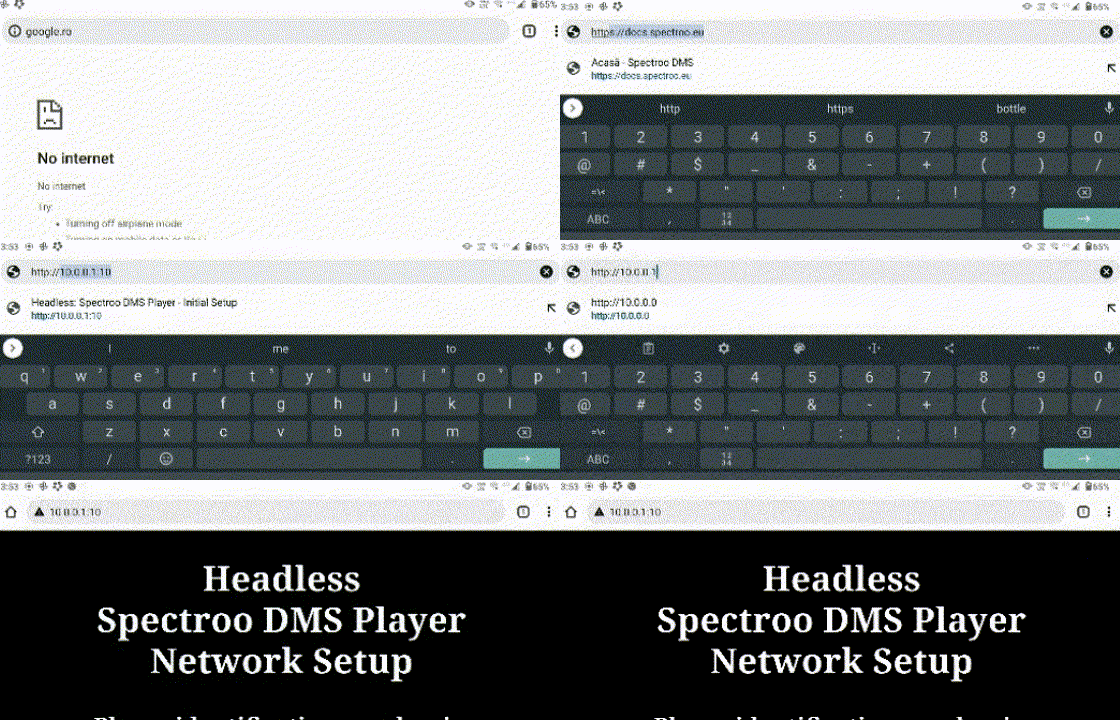
By following the above steps properly you will notice that on your device you will have another set of instructions to go through.
-
For the last step in the “Network config mode active…” category:
“3. Follow the given instructions.”
It is necessary to choose how we want to connect the player to the network, we can choose to connect via WI-FI, LAN cable or a Modem stick.
3.1. Network configuration via WI-FI:
3.1.1. WI-FI near us:
In the video we opt for a WI-FI connection near us:
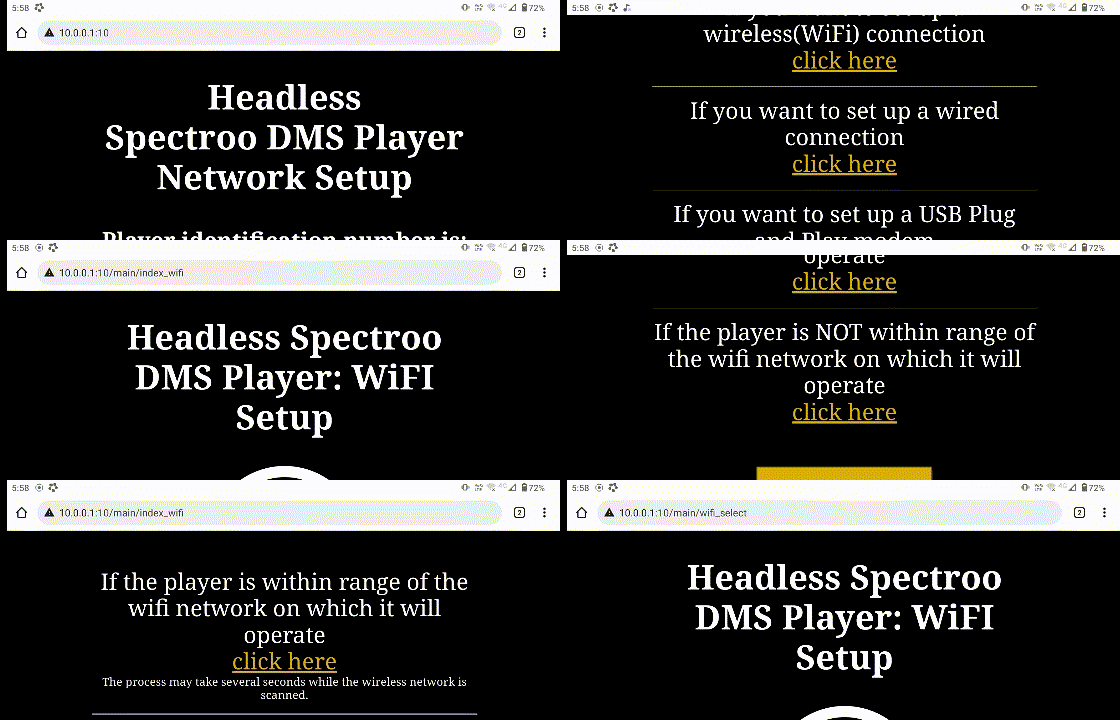
In the video below we will show you how to set up the Player for a nearby WI-FI connection:
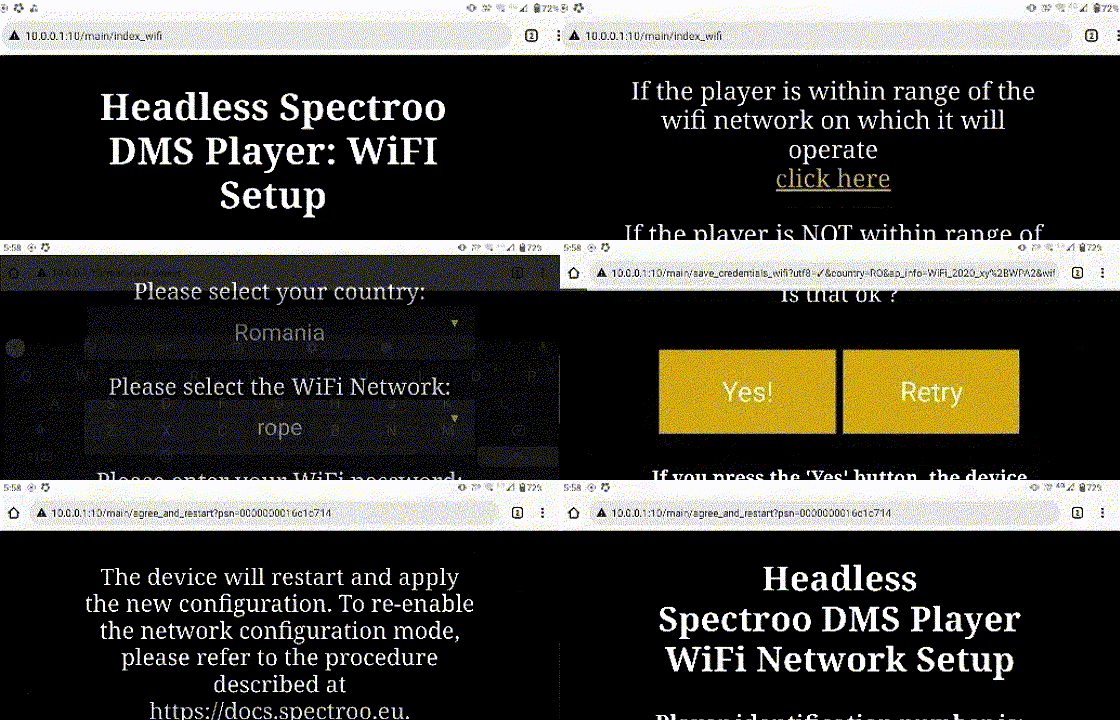
Select the WI-FI network in your area, add your password and save. Follow the instructions carefully and you will be fine.
3.1.2.WI-FI that is not located near us:
We can also opt for a WI-FI connection that is not in our area, in the video below we see how we can do this:
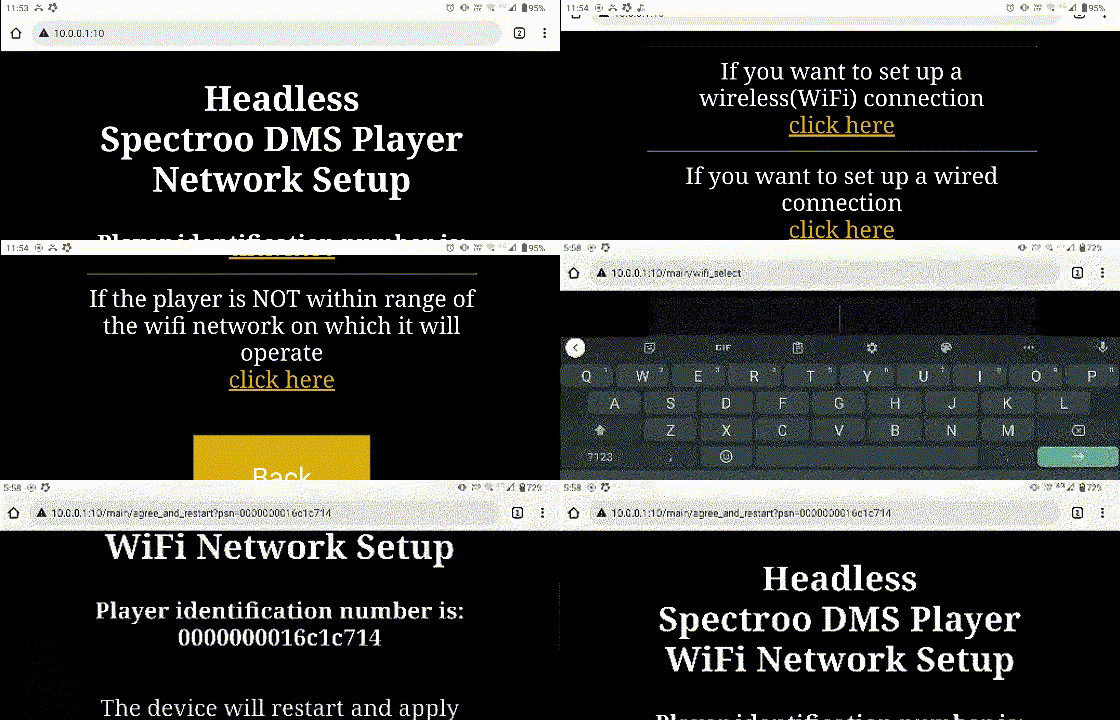
3.2. Network configuration via LAN cable:
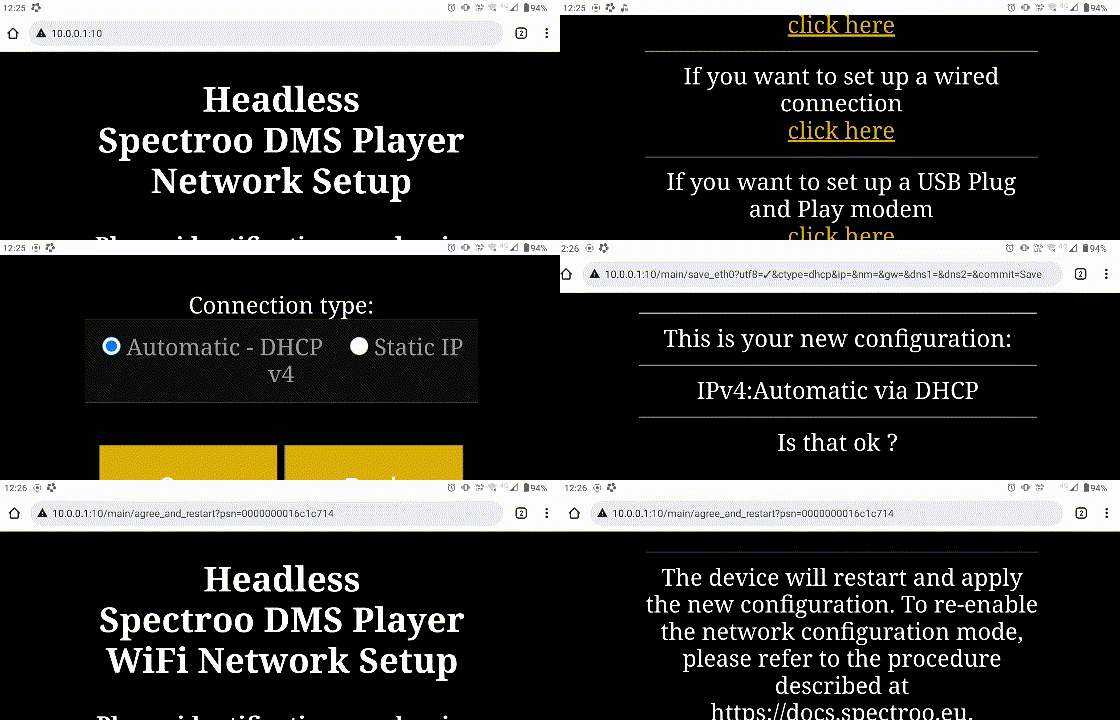
3.2.1. Player configuration via LAN network cable with Automatic DHCP v4:
In the video below you can see how to make a network connection over a LAN cable via an Automatic DHCP v4 connection:
3.2.2. Player configuration via LAN network cable with Static IP:
Please note that the data used in this video are not real, they are used strictly as an example and you should set your configuration according to your preferences.
In the video below you can see how this is done:
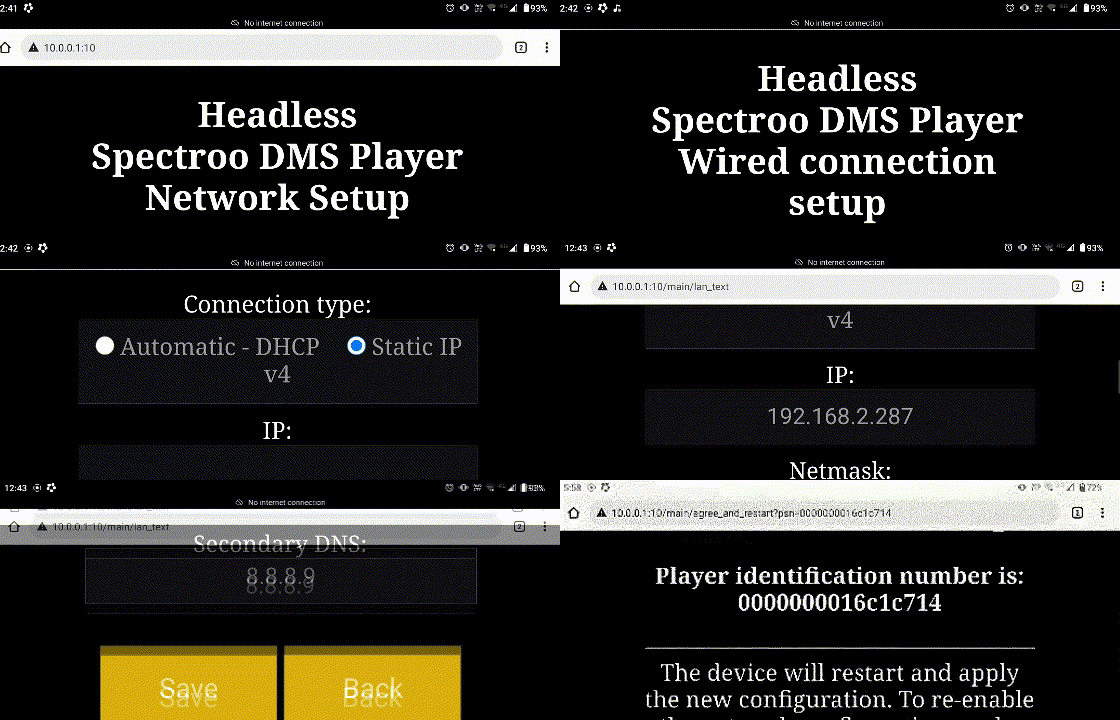
3.2.3. Network configuration through a Modem stick
For this step it is necessary to contact the Spectro:o team. See the Contact section.
-
Player connection with Spectro:o DMS platform
Completing the “Network config mode active…” step correctly will allow us to go through the second step, “How to pair this player with the management platform”.
It will be necessary to reconnect to a WI-FI network in order to have Internet access on the device again.
Let’s go through this step together.
-
First step:
“1.Open browser and navigate to https://dms.getconnected.ro .”
In the video below you can see how to access the link https://dms.getconnected.ro :
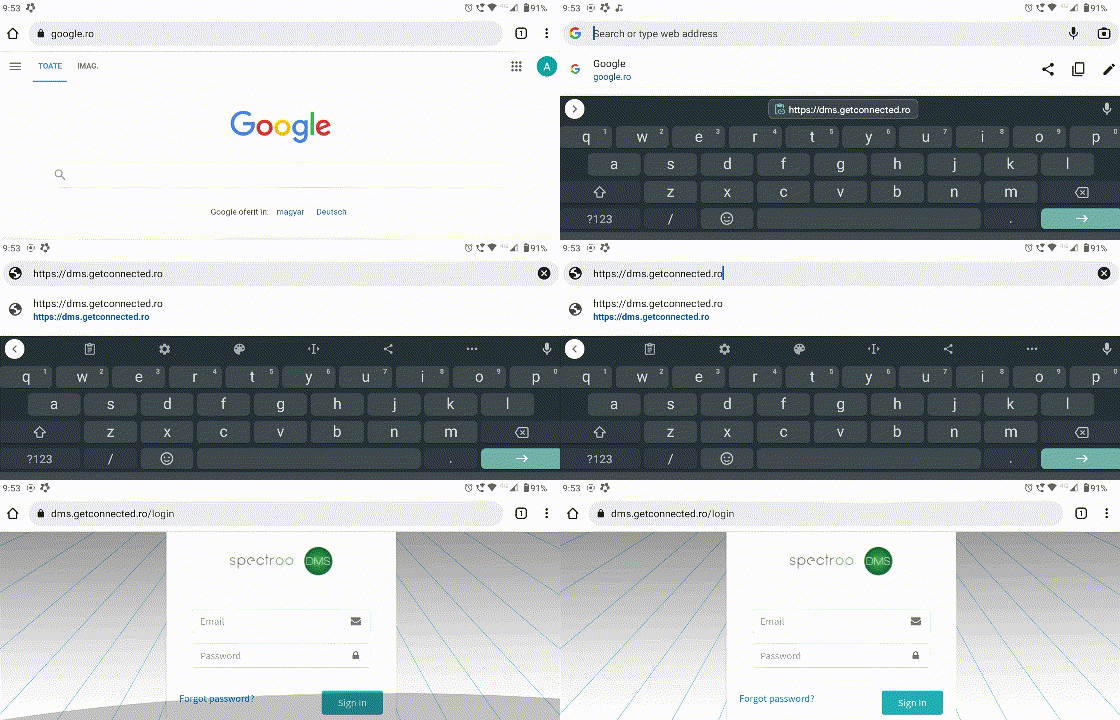
We use the e-mail and password assigned to our account to log in to the platform so that we can proceed to the next step.
-
The second step:
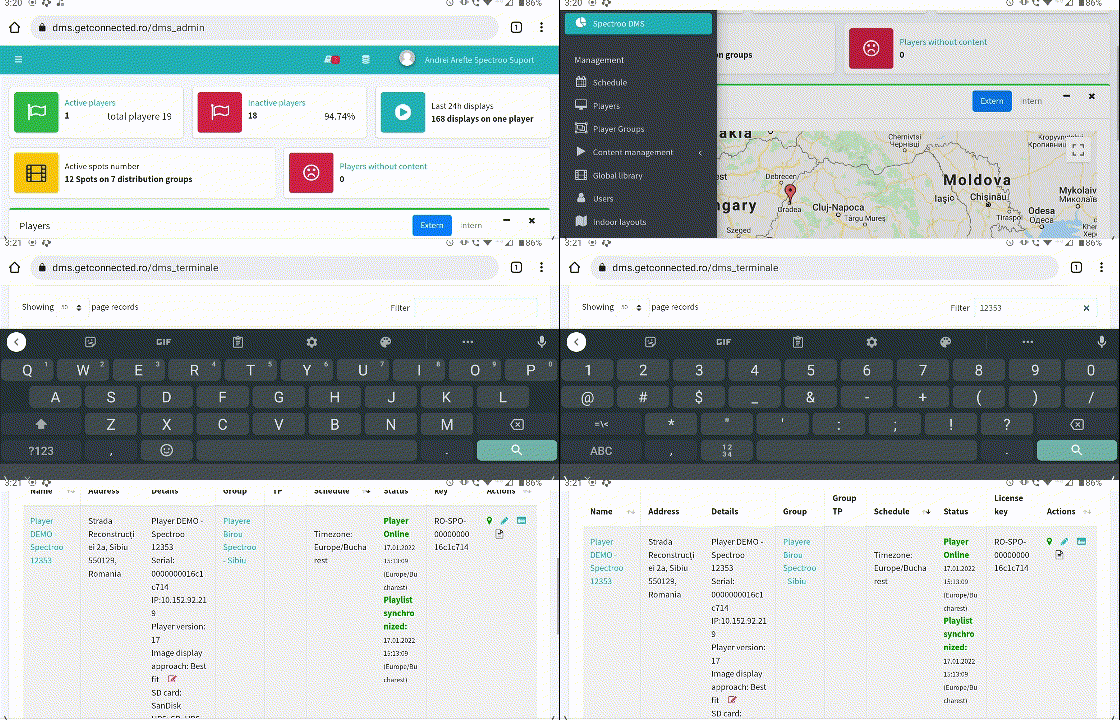
“2. From the meniu select player”
To explain this step, we will use a DEMO player, so you will have to assign another “Identification number” in the “Filter” section to find the player you are interested in.
In the video below you will see how to enter this section:
-
Third step:
“3. Add new player or edit existing one.”
How do I add a new player?
To add a new player, click on the Add player button at the top left of the player register and fill in the details below for the new player.
The specific details of a player are:
Name – represents the name of the player and under this name it is subsequently presented in the management platform as well as in the central reports.
Details – in this text field you can add any details (comments) you wish to keep.
Address, Latitude and Longitude – represents the geographic position of the player, and this information will be used to map the exact location of the player installation. Warning! This data will be filled in automatically by searching for the location on the map or by moving the mouse cursor on the map at the bottom of the page and does not need to be entered manually. The “Address” field can be changed later as desired.
Base group – represents the group of players to which the current player belongs. To change the group, choose another group defined in the system by selection.
Schedule – if you want a custom schedule for the current player, you can choose this schedule from the selection list.
Time zone – choose the time zone of the country where the player will be installed in order to run the spots correctly at the time in the destination country and to report the runs correctly in the application (date and time in the destination country of the player).
Identification number – is the unique identification number of the player. This field should only be changed when absolutely necessary. Changing this information by mistake will disconnect the player from the management platform and prevent it from synchronizing content.
At the bottom of the player page, you can choose a position of the player on the internal map. To do this, you need to select an internal layout shape from those loaded in the Location maps section.
The video below shows you the entire Players section of the web administration platform:
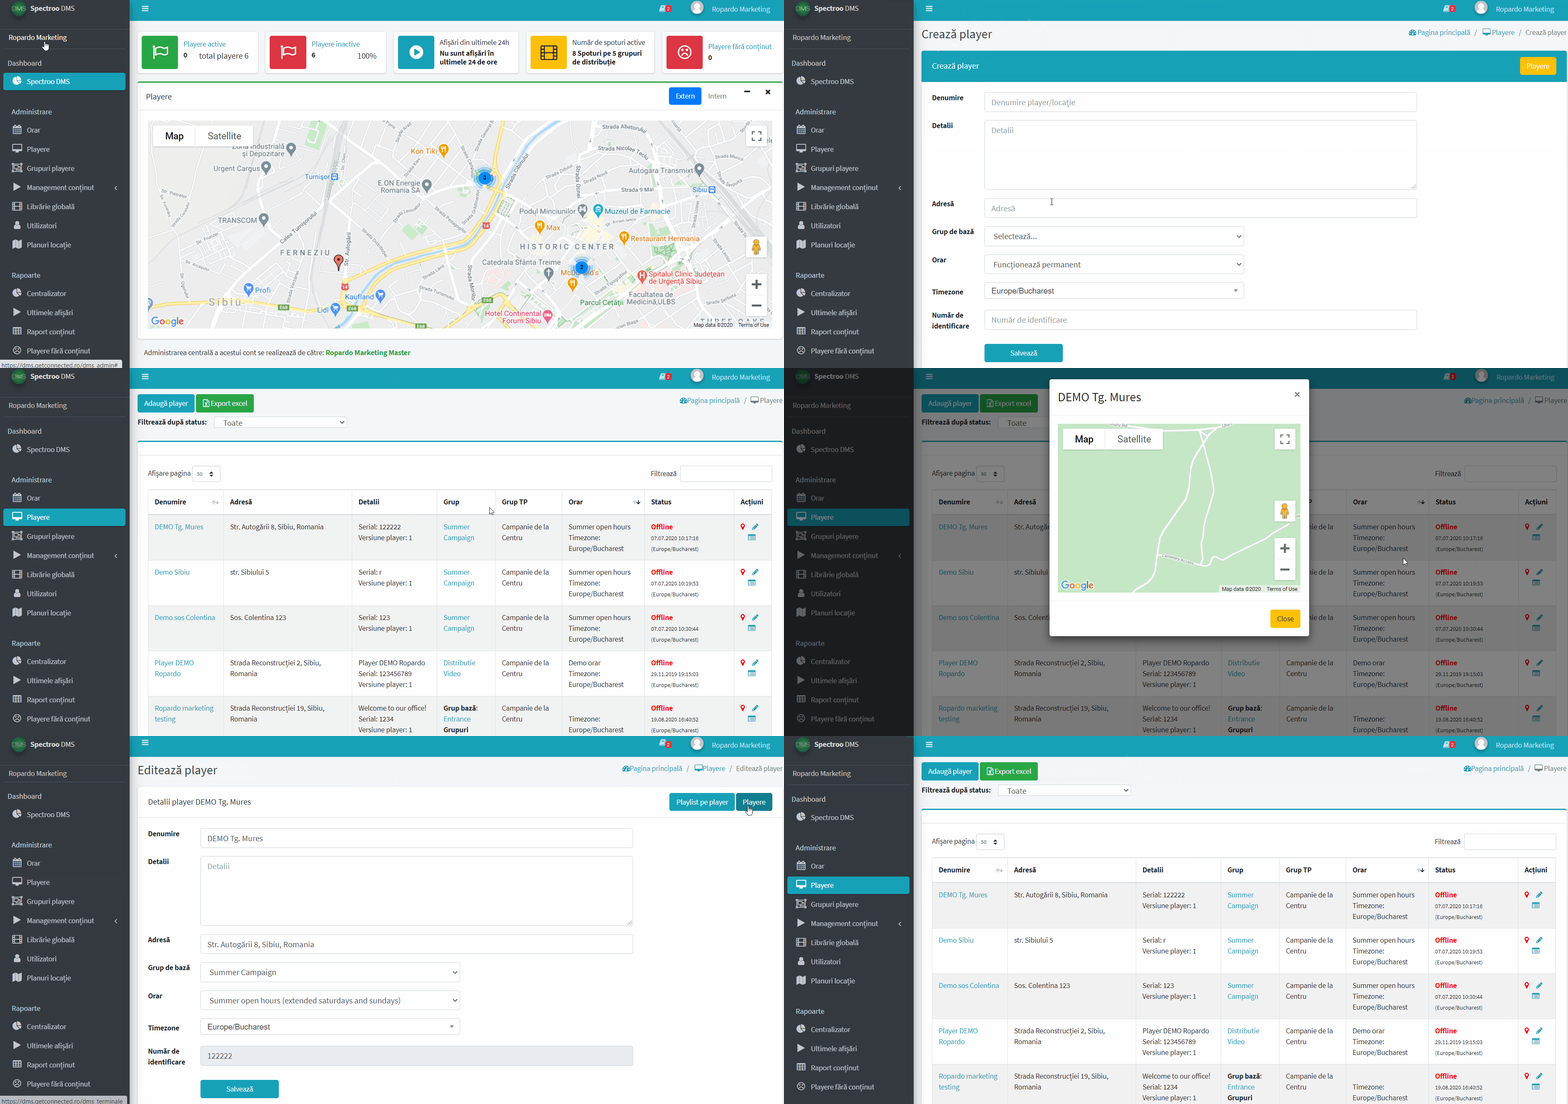
At the end of filling in the information, don’t forget, click Save.
The main page of this module gives us access to the playlist register with possibilities to edit existing playlists, add new playlists and EXCEL export the whole list of playlists registered in Spectro:o DMS.
In the Details column you can see player details such as :
– Terminal ID xxxxx ( number automatically assigned by Spectro:o DMS )
– Serial which is the unique identification number of the player in Spectro:o DMS
– IP = the ip from which the player is connected or last connected to the server
– Player version: xx ( the version number of the software running on the player )
The Group column shows the player’s base group and other groups in which it is added as an auxiliary player, if any.
The TP Group column will show the group from which paid content (if any) arrives on that player.
The Timezone column will show the player’s operating time (if one has been set, if not, then nothing is specified) and also the player’s Time zone.
The Status column shows the status of the player’s connection to the server (Online/Offline) and the last time the player was connected to the management server.
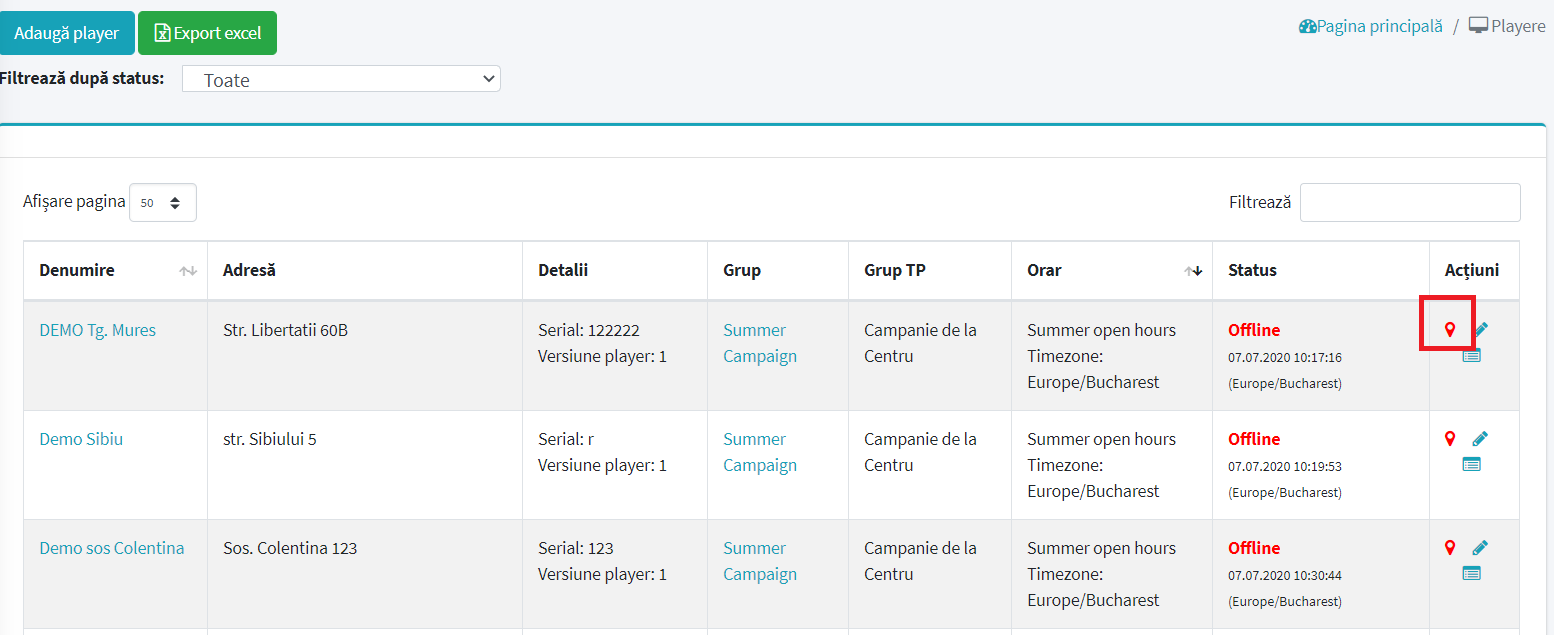
In the Actions column you can view:
![]() The location of the player on the map by clicking on the View icon as shown in the image below:
The location of the player on the map by clicking on the View icon as shown in the image below:
How to edit a player?
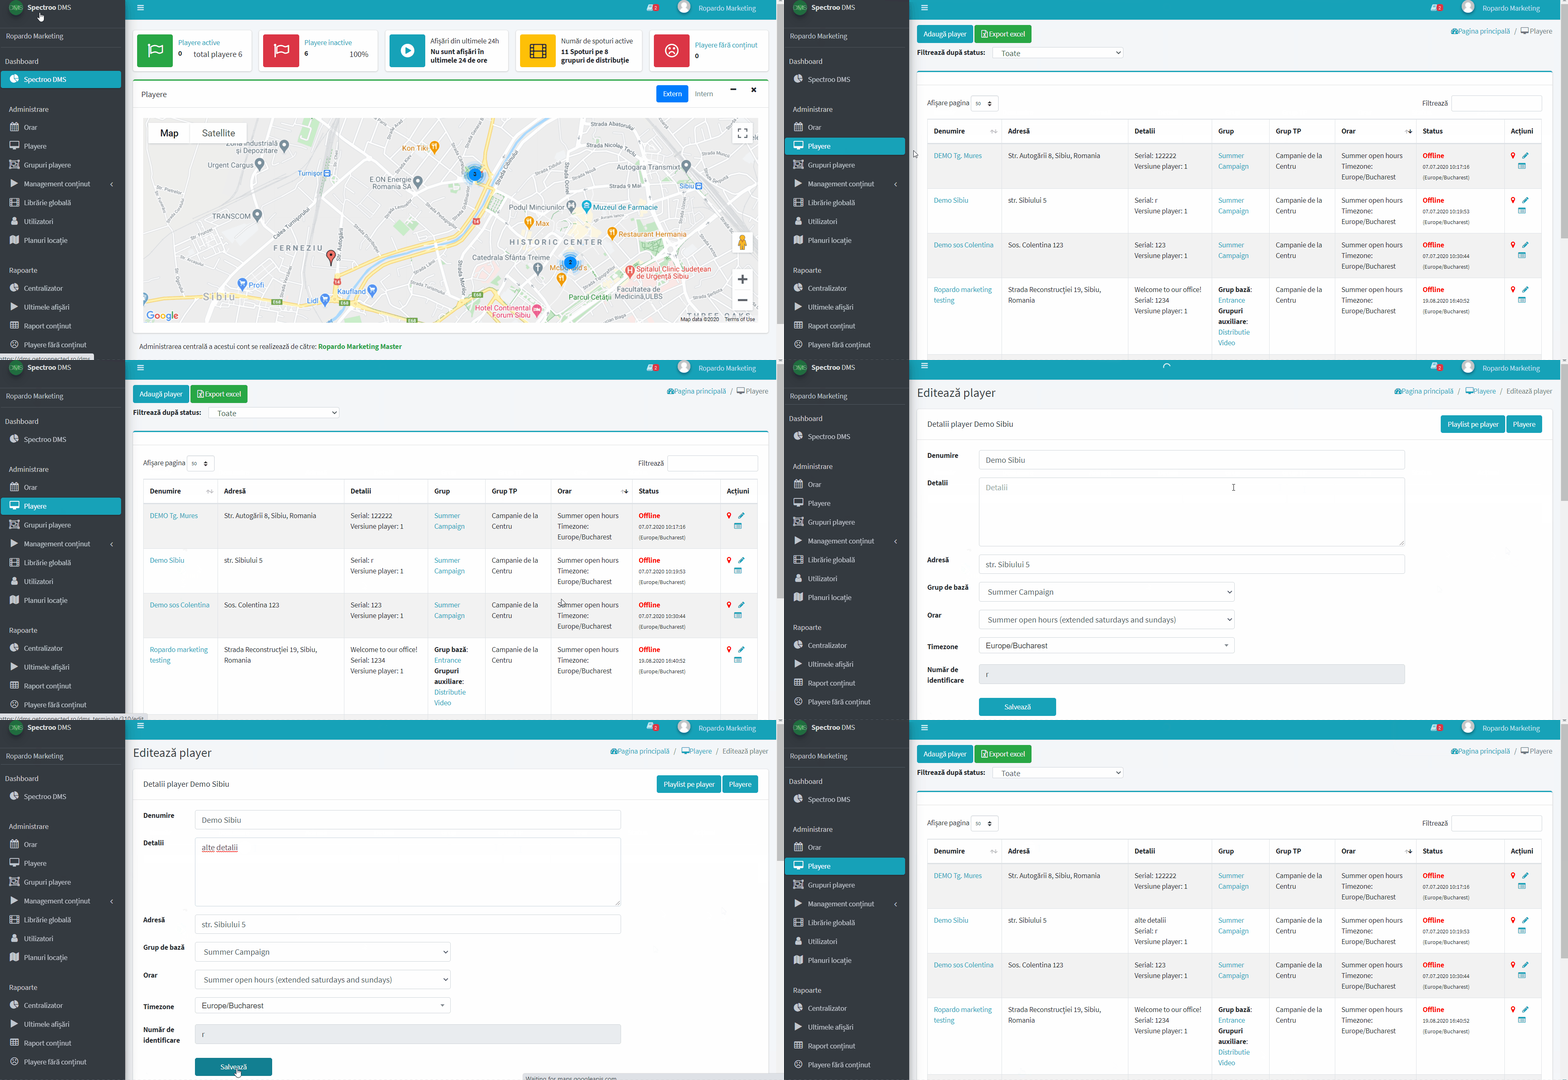
You can edit a player in 4 steps as follows:
1.Click on Players, the main menu item on the main page of the Spectro:o DMS application.
2.Click on the name of the player or on the pencil icon ![]() in the Actions column to go to the menu with the player’s specific data.
in the Actions column to go to the menu with the player’s specific data.
3.Edit the player details.
4.After editing the desired information, click Save. If errors occur, they will be displayed below the fields to which they refer.
-
The fourth step:
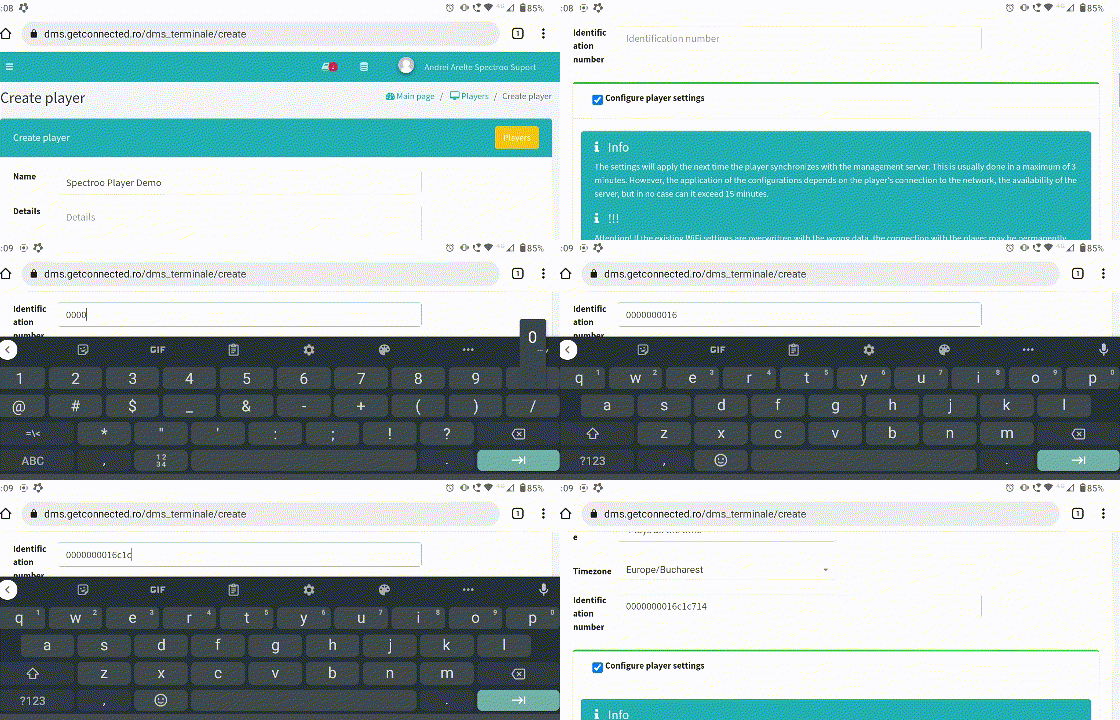
“4. Fill in the “Identification number” field with:
0000000016c1c714”
Note that each player has a unique “Identification number”, which you will find on the player label.
Ex: “0000000016c1c714”
Watch this video to see how this is done:
-
Step five:
In the last step we will click on the Save button in the platform and in this way we have completed the whole process.
Below is an image from the platform where you can see the “Save” button that we will press after we have filled in all the fields above:
