• Spectro:o DMS
  • Spectro:o Digital Signage
  • Contact
  • English
    • Romanian
  • Spectro:o DMS
  • Spectro:o Digital Signage
  • Contact
  • English
    • Romanian

Spectro:o DMS

home/Documentație/Spectro:o DMS
Popular searchFirst Steps, How to access the Management Platform, General Information
Expand All Collapse All
  •  General Information
    • Player installation procedure
    • Player connection procedure to the network
    • System Overview
    • Acronyms and Abbreviations
    • Contact
  • HelpDesk Spectro:o
  •  Web Administration Platform
    • How to access the Management Platform
    • First Steps for a New User
    • Schedule
    • Players
    •   Player Groups
      • How to edit a Player Group?
      •   How to add a Player Group?
        • Types of Playlist
        • Fillers
      • How to automate your playlists with Spectro:o DMS?
    •   Content Management
      • Video files
      • Images
      • Fillers
      • Audio upload
      • Audio playlists
      • How to manage Paid Content?
    • Global Library
    • Users
    • Indoor Layouts
    • Sponsors
    • Centralizer
    • Last Displays
    • Content Overview
    • Players without Content
    • Audit
  • Verification process in case of malfunction
  • Verification Process in Case of Malfunction – SP 4G Module –

First Steps for a New User

The Spectro:o web administration platform is the place where magic happens. But in order to make the best of the platform we highly encourage new users to follow a few simple steps.

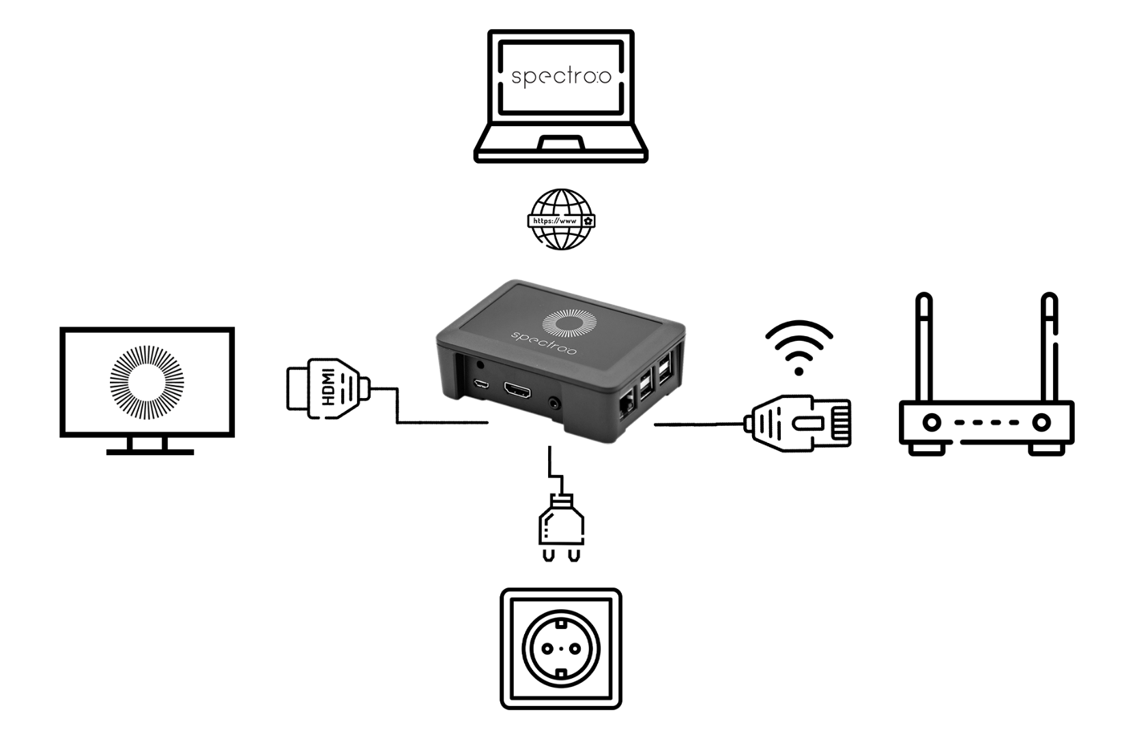
Step 1: Before anything else, please check the cables to see if they are properly connected to a terminal (TV, display, etc). Then plug in the player to a power socket. 
 

Step 2: How to access the Web Administration Platform?

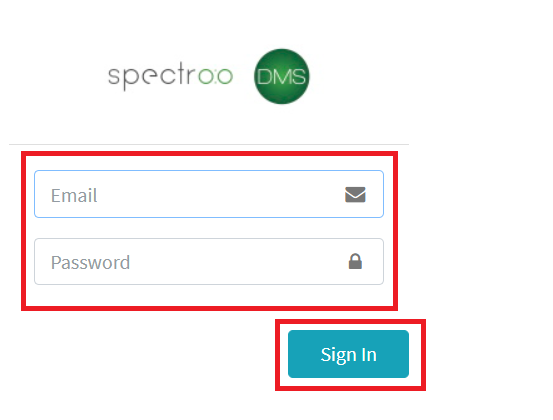
The very first step is to log in to the web administration platform. So, to log in please click here. Next, you need to fill in your credentials and click Sign in.
Step 3: How to add content on the platform?

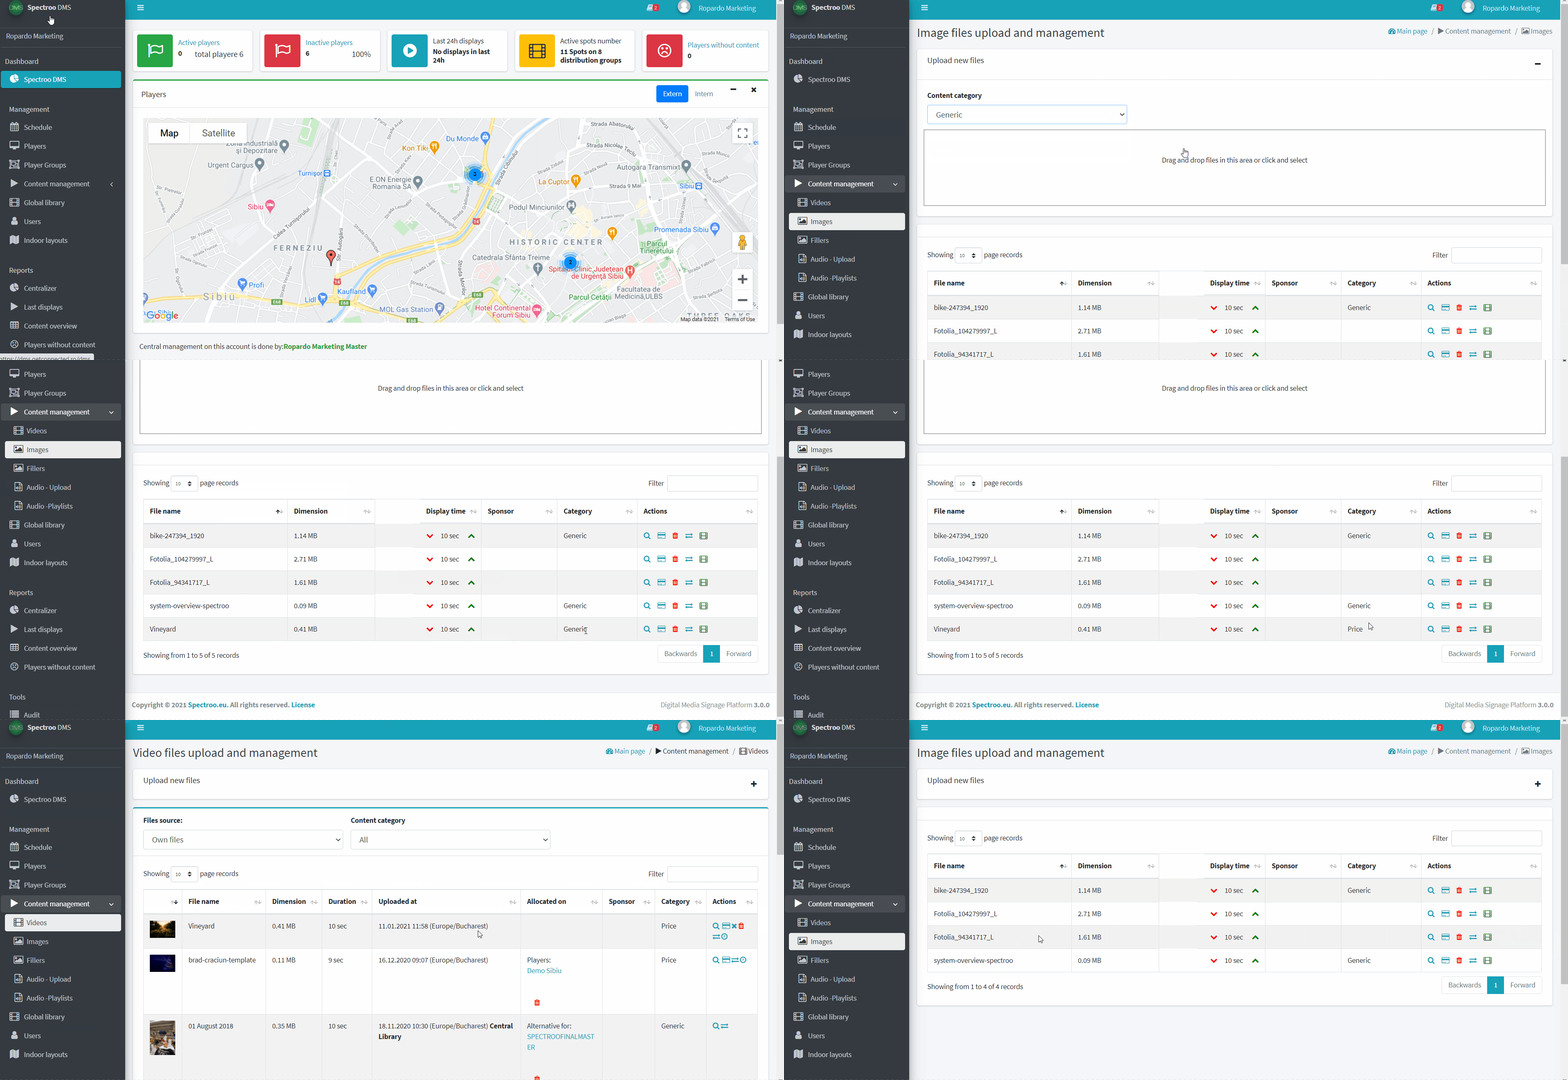
After you log in you have access to the main Dashboard. Go to the Content Management section on the left side of your screen. Here you can add your content.

Notice: when we say content we mean any type of content, be it an image or/and  a video. 

Let’s say you want to upload an image. On the Content Management section, click on Images, and on the right of your screen you have a plus sign +. Click on it to upload an image. Easy, right? Here’s a short video:
Step 4: How to add content on a Player or on a Groups of Players?

Ok, now that you’ve uploaded an image, you need to add your image to a player. How do you do that?

You must first have a player installed. See the Players section and learn How to add a new player, or learn more about these settings in the How to edit a Player Group section.

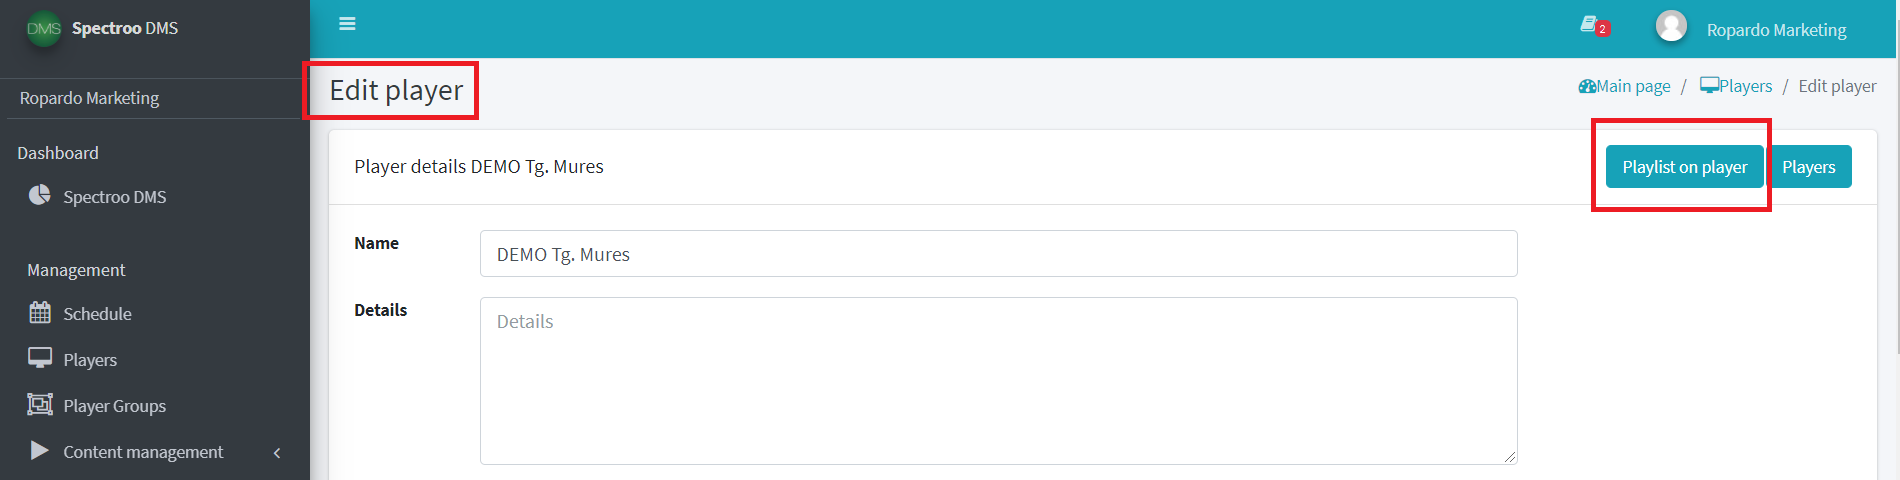
Once you have the player active in the Players section, you can add content to that player. So click on the player’s name. A new page opens. On the right of the screen, click on Playlist on Player, as shown in the image below.
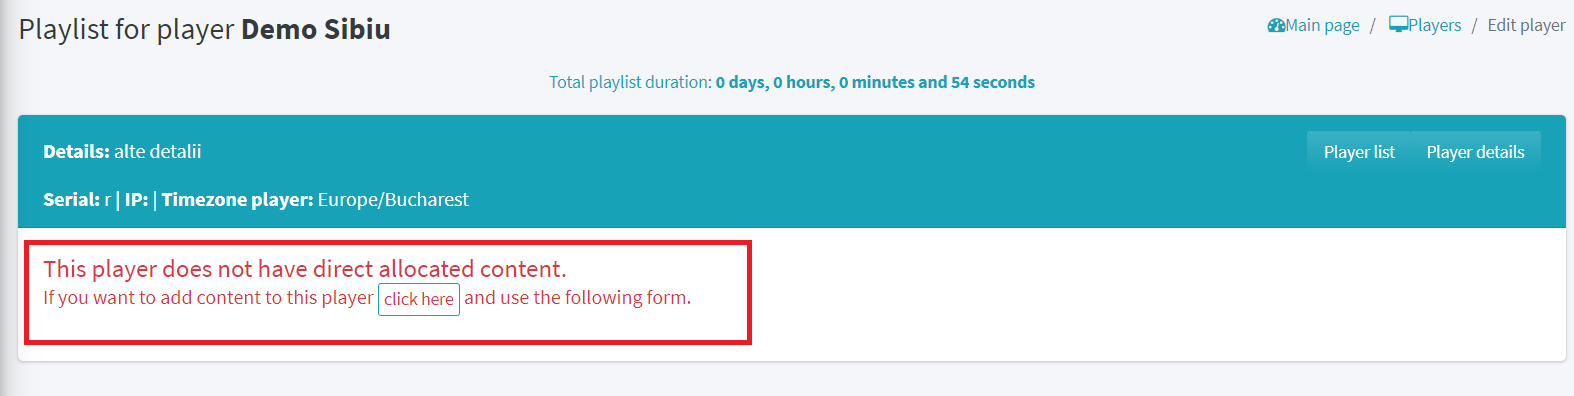
Click on the button where it says click here as seen in the image bellow. You can now add the desired image or video to the player’s playlist.
To find out more details, please access the section dedicated to the Web Administration Platform. Thank you.

Step 5: How to add time and date parameters?

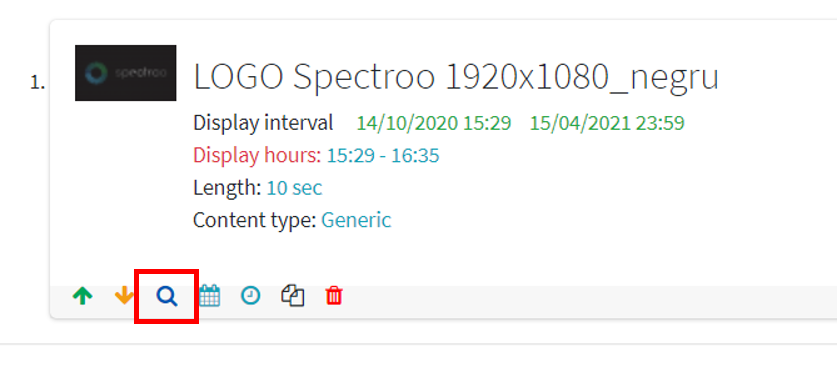
Now that you’ve uploaded the desired image, before you click the Save button, you can set a number of parameters, such as the calendar timeline you want to play in that player’s playlist, the desired media file, and the time to display the selected media file in this playlist within the calendar interval (for example, I want the content to be displayed from 30.10.2020 to 30.04.2021  from 23:59 to 00:00, as in the image below):

Note: If you want to permanently play in the playlist, that is to repeat the multimedia content inserted in the playlist without time limits, the fields under Select hours interval to be played remain blank.

Step 6: How to change parameters in the playlist?

Once the content is in the playlist, all the actions available in the video playlist are:

  • View video

  • Set different display intervals for each line

  • Set different display time range for each line

  • Duplicate line

  • Delete line

Step 7: Enjoy! 😎

Was this helpful?

Yes  No
Related Articles
  • Player installation procedure
  • Player connection procedure to the network
  • HelpDesk Spectro:o
  • General Information
About Spectro:o DMS
Spectro:o is an intuitive platform that helps you manage and distribute digital content on an endless number of screens.
Useful Links
  • General Information
  • Web Administration Platform
Contact Us
  • Reconstructiei, 2A 550129 Sibiu, Romania
  • dms [at] spectroo [dot] eu
  • Privacy Policy
  • © 2021 Spectro:o. All Rights Reserved.

Administrează consimțământul
Pentru a oferi cea mai bună experiență, folosim tehnologii, cum ar fi cookie-uri, pentru a stoca și/sau accesa informațiile despre dispozitive. Consimțământul pentru aceste tehnologii ne permite să procesăm date, cum ar fi comportamentul de navigare sau ID-uri unice pe acest site. Dacă nu îți dai consimțământul sau îți retragi consimțământul dat poate avea afecte negative asupra unor anumite funcționalități și funcții.
Funcționale Always active
Stocarea tehnică sau accesul este strict necesară în scopul legitim de a permite utilizarea unui anumit serviciu cerut în mod explicit de către un abonat sau un utilizator sau în scopul exclusiv de a executa transmiterea unei comunicări printr-o rețea de comunicații electronice.
Preferințe
Stocarea tehnică sau accesul este necesară în scop legitim pentru stocarea preferințelor care nu sunt cerute de abonat sau utilizator.
Statistici
Stocarea tehnică sau accesul care sunt utilizate exclusiv în scopuri statistice. Stocarea tehnică sau accesul care sunt utilizate exclusiv în scopuri statistice anonime. Fără o citație, conformitatea voluntară din partea Furnizorului tău de servicii de internet sau înregistrările suplimentare de la o terță parte, informațiile stocate sau preluate numai în acest scop nu pot fi utilizate de obicei pentru a te identifica.
Marketing
Stocarea tehnică sau accesul este necesară pentru a crea profiluri de utilizator la care trimitem publicitate sau pentru a urmări utilizatorul pe un site web sau pe mai multe site-uri web în scopuri de marketing similare.
  • Manage options
  • Manage services
  • Manage {vendor_count} vendors
  • Read more about these purposes
Vezi preferințele
  • {title}
  • {title}
  • {title}
Popular searchFirst Steps, How to access the Management Platform, General Information